  The
Black
Strat Project #1
Project Start: October 2008
Project Completed: January 31,
2009 |
|
July 4, 2011: In looking back over the last
2-1/2 years at this initial Black Strat® project a lot
of innovation and change has come about in the
production of our custom Black Strat® parts, kits and
assemblies. We've learned a lot along the way
in how to accurately replicate an authentic Black
Strat® pickguard assembly. Our current
production of Black Strat® parts and assemblies are
considerably more complex, unique and that much more
authentic to the original than the one depicted
below, but none-the-less, this project was the starting point that
lead us through many series of improvements,
enhancements and changes. Then with the purchase of
both the NOS and Relic version of Fender's Custom Shop
Gilmour Strat's, we now have a lot more insight for a
number of details that make the difference between a
simple knock-off and an accurate reproduction. We're proud to be able to
provide our customers with products that are the
most authentic in production outside of the Fender® Custom Shop. Take a look at our
Black Strat® Parts
page for a complete listing all of our updated and most
current designed
Black Strat® parts, kits and complete pickguard assemblies.
Black Strat
Electronics Analysis:
Be sure to read our detailed
technical comparison we performed with the Relic and NOS
Fender Custom Shop Gilmour Black Strat electronics in
relation to our custom Black Strat pickguard assembly.
Read The Full Article Here.
Seymour Duncan's Custom
Shop Hand Scatter-Wound "SSL-1C DG" Pickup -
Our relationship with the Seymour Ducan Custom Shop
begain in January 2012 where we
are began having this bridge pickup specially wound for
us which a lot
of you serious Gilmour Black Strat® builders have sought after. These are original,
authentic Seymour Duncan Custom Shop hand scatter-wound
pickups. These pickups are available
separately
or installed in our
Complete Black Strat® Pickguard
Assemblies. We are
having two versions of this pickup custom wound for us,
for full details on the two versions
read the full article
here.
|
|
Complete Project Build Components
- 2008 Fender® 1962 Re-Issue
MIJ Stratocaster® Body, Black
- 2008
Fender® 1957 Re-Issue USA Stratocaster® Maple Neck, 21 Fret, 7.25" Radius, Soft V
Shape
- 2008
Fender® 1957 Re-Issue Gotoh Vintage Style Tuning Machines
- 2008 Fender® 1962 Re-Issue Hot
Rod Strat Serialized Neck Plate
- 2008
Fender® 1962 Re-Issue Output Jack Assembly
- 2006
Callaham Vintage S Model Bridge Assembly w/Custom Super Short 4¼"
Tremolo Arm
- Seymour
Duncan SSL-5 Custom Staggered Bridge Pickup
- Fender® Custom Shop Custom '69 Middle Pickup
- Fender® Custom Shop Fat '50s Neck Pickup
- Black 1 Ply 0.090" 11 Hole Pickguard (Custom Routed For Mini-Toggle)
- Fender® Accessory Kit (White)
- Fender® Vintage Strap Buttons
- Fender® 5-Way Pickup Selector Switch
- CTS 250k "No-Load" Tone Control Potentiometers (Audio
Taper) [Quantity 2]
- CTS 250k Volume Control Potentiometer (Audio Taper)
- 0.022 uF 100 Volt 225 Series Sprague Polyester Orange
Drop Tone Capacitors [Quantity 2]
- Treble Bypass Filter (AKA Treble Bleed Filter)
- SPDT Mini Toggle Switch
- GHS Boomers 10-48 David Gilmour Signature Series Strings
- 2008 Fender® / SKB Hard-Shell Case
- Conductive Adhesive Copper Shielding Foil
- Dremel Rotary Tool Nose Piece Attachment For Routing
(Craftsman #53141)
- Hi-Speed 1/8" Straight Router Bit (Craftsman #53090)
- Custom Routing Jig For Mini Toggle Switch Hole Slotting
- Custom Stainless Steel Recessed Mini Toggle Switch
Mounting Bracket
- Miscellaneous Wire, Pickguard/Output Jack/Tremolo Cavity
Cover Screws & Felt Washers
|
In The Beginning...
Before OverDrive Custom Guitar
Works was even a gleam in my eye....
This Gilmour style Black Strat® project was simply built for my own personal
amusement and enjoyment, I had no idea it would be
the building blocks for a full blown dedicated Strat® parts resource in less than 3 months. But that is
exactly what happened in March of 2009, OverDrive
Custom Guitar Works was born...
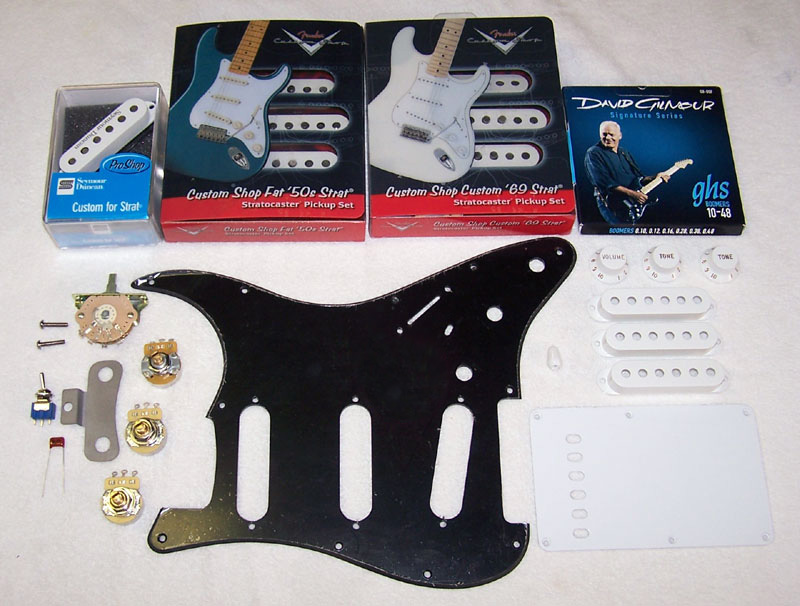
Electronic
parts, pickguard and components all laid out prior to assembly. Seymour
Duncan SSL-5 Custom Staggered bridge pickup, Fender® Custom Shop Fat 50s
pickups (neck), Fender® Custom Shop Custom '69 pickups (middle), GHS Boomers
10-48 strings, Fender® white accessory kit, all black 1 ply 0.090" black vinyl
pickguard (with clear protective sheeting still affixed), Fender® 5-way
pickup selector switch, two CTS 250k no-load tone potentiometers, one CTS
250k volume potentiometer, custom stainless steel
mounting bracket for recessed mini toggle switch, SPDT mini toggle
switch (neck / bridge pickup mod.), tone capacitor. I swapped out
the "Seymour Duncan" white with silver logo'ed pickup cover that came stock
on the SSL-5 with a plain white Fender® cover in the final assembly.
Since each of the Custom Shop Fat '50s pickups in the set of three are
of different resistance and inductance the pickup designated "neck" (blue
dot) was the only one used out of this set for my neck pickup. The
set of three pickups in the Custom Shop Custom '69 pickups are all of the
same resistance and inductance so it made no difference which one was used
for the middle pickup.
|
|
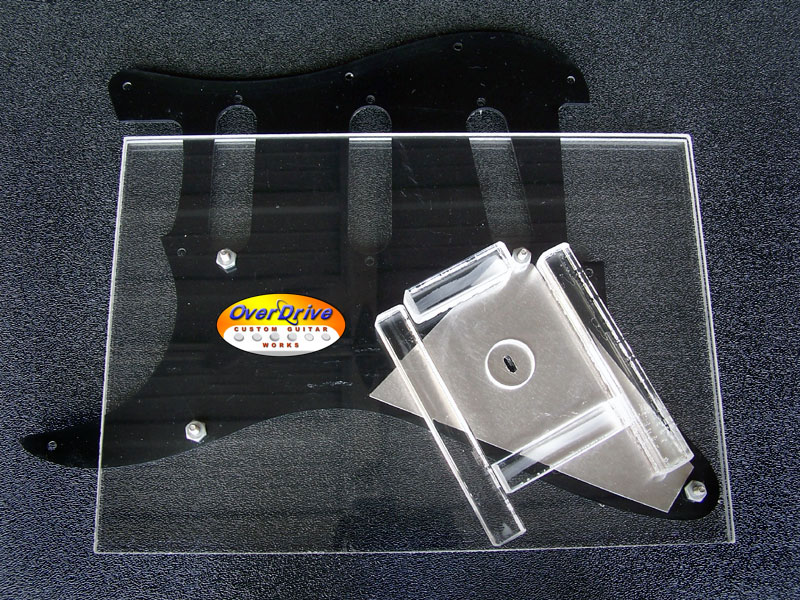
The custom made routing jig/guide
(clear Acrylic) used for precise routing of the small elongated hole in
pickguard for the recessed mini toggle switch. Using the rotary tool
with the routing base attached the clear routing jig did not allow any
lateral movement of the rotary tool, it only allowed for forward and backward
movement required to create the slot. The pickguard is held securely
in place sandwiched in-between two pieces 3/16" thick 7" x 10" acrylic sheets
(free remnants at a local Tap Plastics) held tightly in place with four
6-32 mounting bolts which align with two of the perimeter pickguard mounting
screw holes and two of the pickup mounting holes. In both of the
clear acrylic sheets there is a 3/4" hole in the location where the slot
is to be routed to allow access of the routing bit on the top side and
clearance on bottom side. The actual jig itself is made out of 1/2"
square acrylic bar stock and held in place on the top sheet of acrylic
with "Acrylic Cement" which is a solvent type bonding agent that has the
consistency of water and is a applied with a hypo-type applicator.
The bond that the acrylic cement produces becomes as strong as the acrylic
itself for it literally fuses/melts the two pieces together.
This jig precisely aligned
the rotary tool/router in the correct position and orientation for routing
of the small elongated hole so when the mini toggle switch is mounted in
the stainless steel recessed mounting bracket
it would position the switch lever so it would protrude precisely centered
through this small elongated hole. It worked out great, when the
toggle switch is flipped in either the up or down (on) position the toggle
lever has approximately 0.030" of clearance between all edges of the slot...
Perfect!
Normally
when the toggle switch is in the up position, towards the pickups it is
in the OFF position, when it is down (ON) it selects or activates the neck
pickup. But of course this orientation of the switch can be which
ever way is most comfortable and desirable for you and your particular
playing style.
|
|
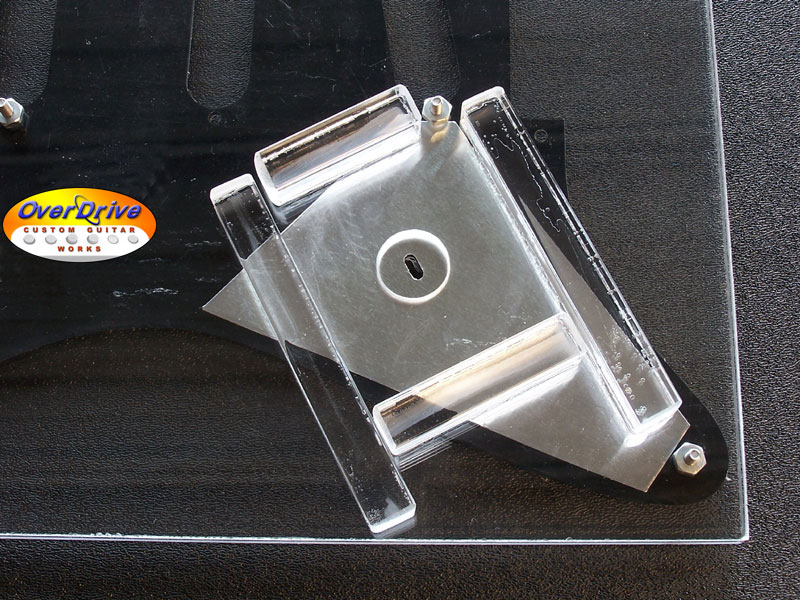
Close
up of the routing jig with a freshly routed pickguard still sandwiched
in-between. The pickguard pictured secured in the jig was the first
pickguard to be routed with this new routing jig and it worked out perfect.
All my calculations and measurements that went into constructing this jig
worked out exactly as expected and produced the desired slot length.
This new routing jig is a dream to use in routing these slots for the recessed
toggle switch, there's no guess work, everything is secure and the slot
can only be produced with the fixed length of 0.300" and the width of the
router bit of 0.125". When I decided to start selling these
pickguard's
pre-routed for this recessed mini toggled switch I figured it was best
to make a new and refined routing jig to streamline the process and help
eliminate a lot of the variables that could be easily introduced with my
original and very basic routing jig. The original jig worked fine
for my first personal project, but this one is so much better and accurate
for small scale production work.
|
|

The variable speed Dremel MultiPro
rotary tool I used for routing the small elongated hole (0.125" x 0.300")
in the pickguard for the recessed mini toggle switch lever to protrude
through for the neck and bridge pickup modification. I set the rotation
speed to approximately 8,000 to 9,000 RPM's which is just a little bit
faster than the lowest speed (5,000 RPM) this rotary tool is capable of
and no melting or chipping occurred indicating it was not too fast nor
too slow.
|
|
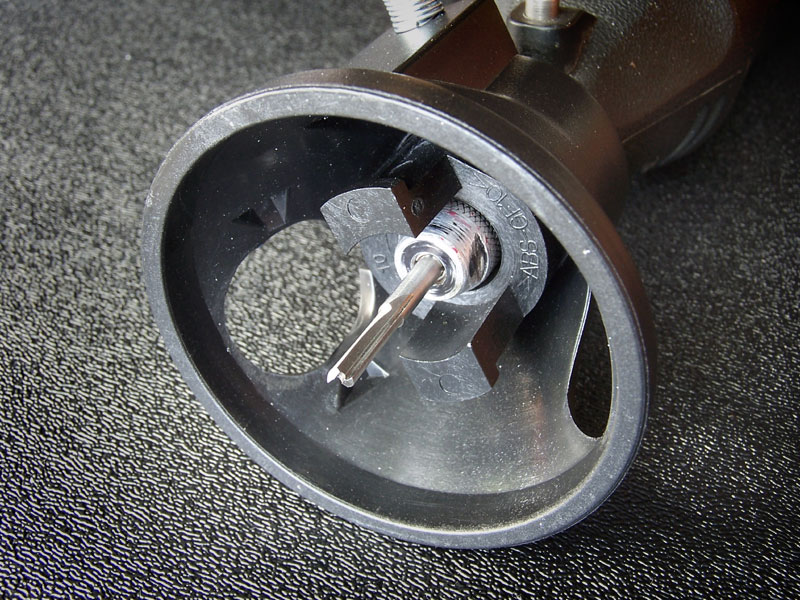
Close
up detail of the router nose piece attachment and the 1/8" straight router
bit. The 1/8" shank, 1/8" straight router bit is a Craftsman #53090.
|
|
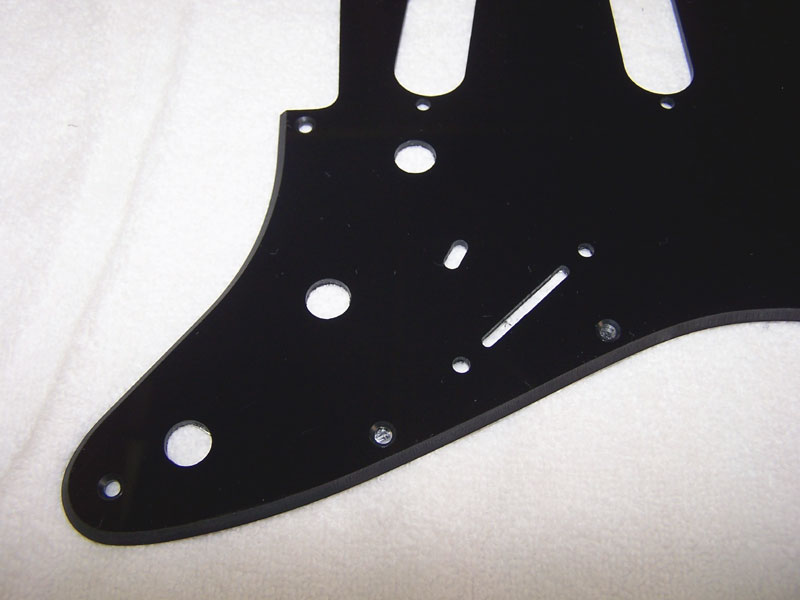
Close-up of the pickguard
after the 0.300" x 0.125" elongated hole was routed out for the recessed
mini toggle switch lever to protrude through.
|
|
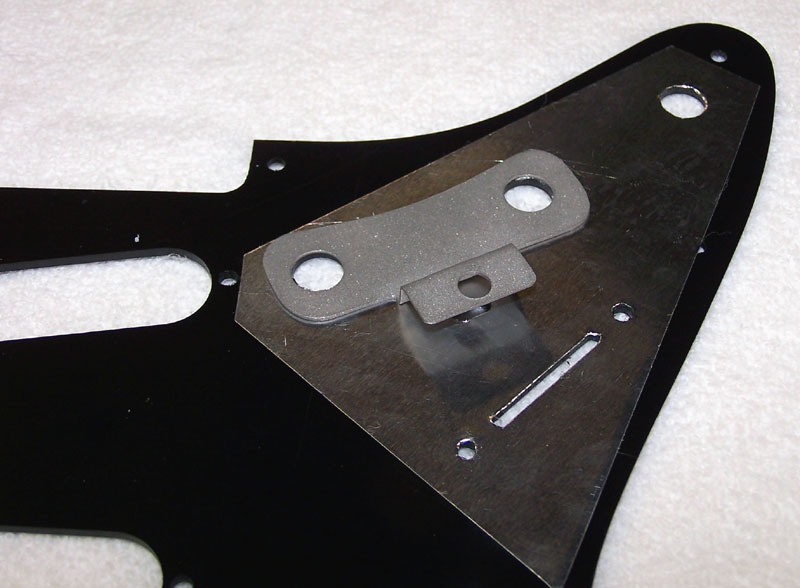
The rear side of pickguard with
the custom stainless steel recessed mini toggle
switch mounting bracket in the position/location as it will be mounted
and secured with the volume and tone potentiometers. After constructing
the recessed mini toggle switch mounting bracket all edges were cleaned
up by filing / grinding of all sharp edges and corners and then finished
up by bead blasting which produced the dull, flat and smooth appearance.
I chose to use stainless steel for this bracket for it's added stiffness
and ability to remain clean and not rust or oxidize through time as ferrous
steel would. Plus I had a few large sheets of this stainless steel
in stock in the shop from a previous unrelated project (darkroom sink).
The thickness of this bracket is 0.030" which allows each of the two securing
potentiometers to still have enough threads protruding through the pickguard
for adequate fastening with the mounting nuts without resorting to the
long shaft versions of these potentiometers. Pictured above is the
very first recessed mini toggle switch mounting bracket I made and it was
bead blasted after final grinding and filing of all the corners. Now I
polish them with a buffer instead of bead blasting, the end result no longer
looks dull and flat gray in appearance, they now take on a nice shine.
|
|
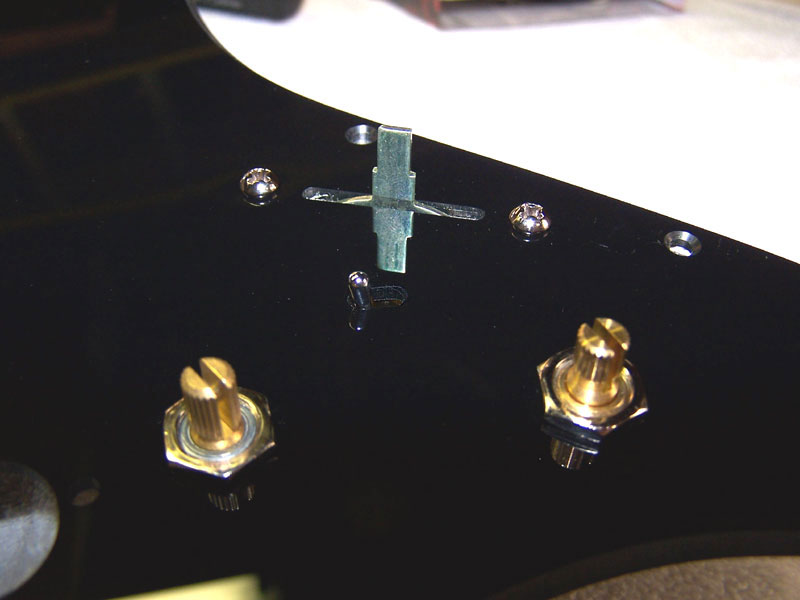
Rear side of the pickguard
showing the volume and tone control potentiometers mounted in place which
secure the stainless steel recessed mini toggle
switch mounting bracket to the pickguard.
|
|
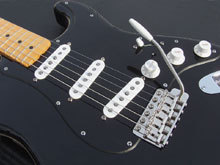
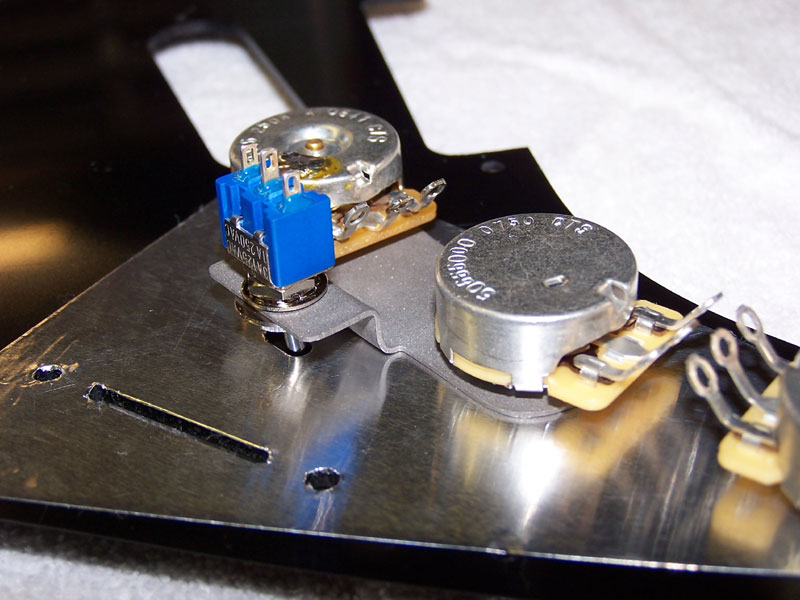
Close up of the top side of
the pickguard just after installation of the volume and tone potentiometers,
the 5-way pickup selector switch and the recessed mini toggle switch.
Notice the very small amount of space to the left of the toggle switch
in-between the toggle lever and the edge of the elongated hole (approximately
0.030"), this same amount of space is the same on the opposite side when
the toggle switch is in the "On" position or flipped to the right as pictured
above. This small amount of space is ideal in order to keep your
slot for your toggle to protrude through at it's smallest possible size
and still allow for the full throw of the toggle switch without hitting
the pickguard when the switch is in either the on or off position.
|
|
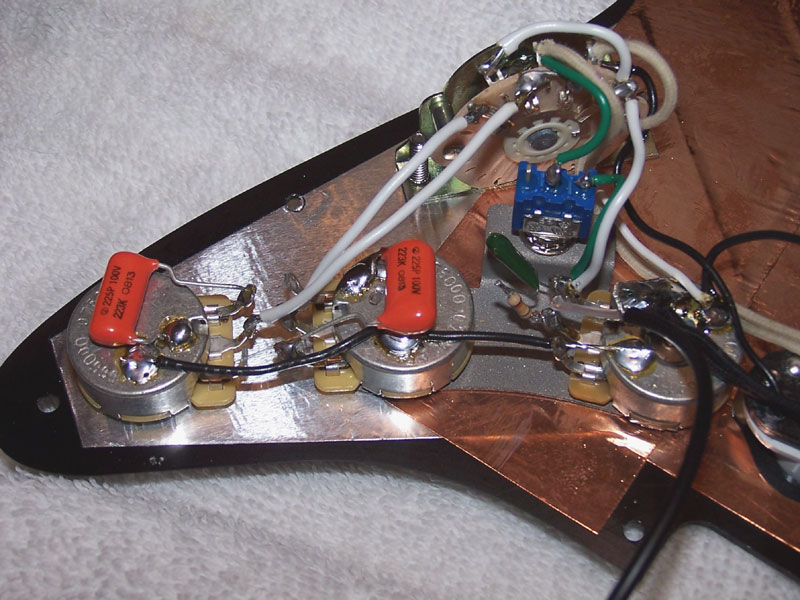
Close-up detail of pickup control
electronics after all wiring was completed. All connections were
done with 22 AWG hook-up wire with RG174/U mini coax for the main audio
lead from the output jack to the volume potentiometer which provides a
shielded central audio lead. In order for the Seymour Duncan SSL-5
to be in phase with the Fender® pickups when selected together the SSL-5
must be wired in reverse, the SSL-5's black wire connects to the selector
switch and the SSL-5's white wire connects to the ground (If you are using
all Fender® pickups then wire them all the same with the white wires connecting
to the 5-way switch and black wires to ground). Both of the no-load
tone potentiometers have their own Sprague polyester 225 series 0.022 uF
100 volt tone capacitor. I intend on swapping out the neck tone capacitor
with a 0.01 uF since the neck pickup needs less roll off of the high frequencies.
It's still a little experimental at this time but I feel that those two
tone capacitor values will suit me fine, just need to get her apart, again!
I have modified the tone potentiometer connections to the 5-way switch
to provide a separate tone control for both the bridge and middle pickup
and a separate tone control for the neck pickup. To achieve a tone
control for the bridge pickup you install a jumper wire between the two
inner most terminals on the 5-way switch on the side where the connections
from the two tone potentiometers connect (outlined below in the wiring
diagram). I have added a
treble
bypass filter on the volume potentiometer to help preserve the high
frequencies when the volume is rolled down.
|
|
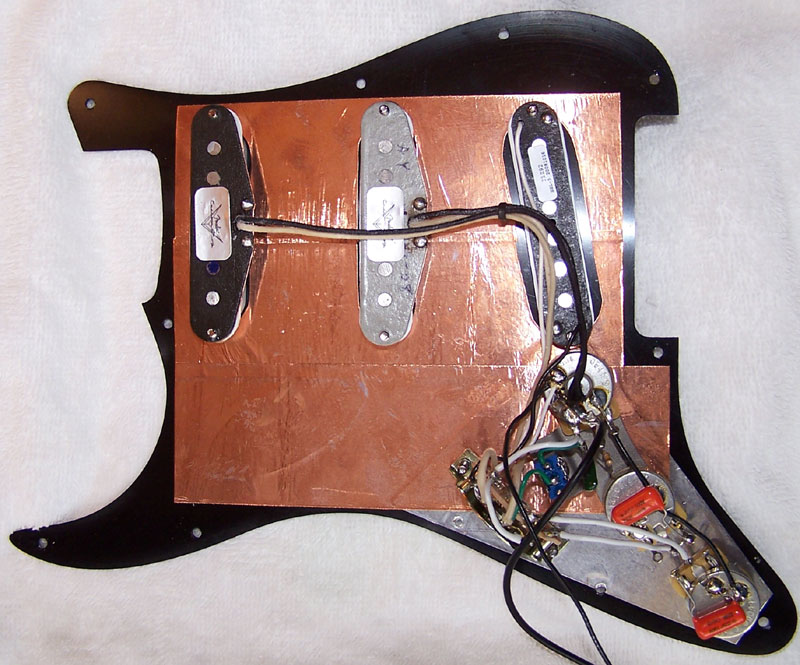
Rear of the pickguard assembly
showing the addition of the adhesive copper foil shielding to help reduce
noise from external sources. As the pickguard came from the manufacturer it only
had aluminum foil shielding in the pickup selection
switch and volume/tone control section. I completed the
shielding on the rear of the pickguard by the addition
of conductive adhesive copper foil. The adhesive on the copper foil shielding is conductive
so all overlapping pieces are conductive to one another. The two
lower holes in the pickguard's aluminum shielding make contact with the
two small copper foil tabs extending out of the body cavity shielding at
two of the pickguard mounting holes as pictured below.
|
|
My Personal
Black Strat® Wiring Diagram
With SPST Mini-Toggle
Switch Modification To Activate Neck Pickup
Tone Potentiometers
are "No-Load" 250K Audio Taper
Volume Potentiometer
is a 250K Audio Taper
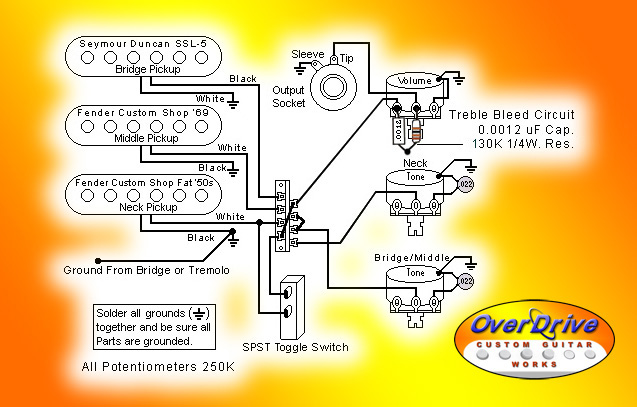
Wiring diagram with mini toggle
switch to activate neck pickup. When the mini
toggle switch is in the down position (as viewed with
the guitar in the playing position) the neck pickup is
turned on in parallel with which ever pickup(s) are
selected with the 5-way pickup selector switch. If
you have the 5-way pickup selector switch in position 5
(bridge) and mini toggle down (on) then both neck and
bridge pickups are active in parallel with each other.
If you have the 5-way pickup selector switch in position
4 (bridge and middle) and mini toggle down (on) then all
3 pickups (neck, middle and bridge) are active in
parallel with each other. In positions 3, 2 and 1
of the 5-way pickup selector switch there is no reason
to use the mini toggle switch (turn on) since the 5-way
pickup selector switch provides the remaining pickup
selections. Notice the small jumper wire on the
5-way pickup selector switch that connects the inner
most terminal connections on the 5-way switch on the
side where the wires from both tone controls connect.
This enables a tone control for both the bridge and
middle pickups. Each tone control in the above
diagram has it's own 0.022 uF capacitor. But by
installing different value tone control capacitors on
each tone potentiometer you can vary the amount of
darkening of your tone based on how much you turn the
tone control down. With values such as 0.047 uF
you'll loose treble from your tone quite quickly, using
values such as 0.01 uF you would loose treble more
slowly as you turn the tone control down. Since
the bridge pickup is intended to be a more brighter
sounding pickup you might just want a subtle amount of
tone control by using a 0.01 uF capacitor, this would
allow more rotation of the tone control before the high
treble rolls off, it would be a less sensitive
adjustment. This
is not an exact replica wiring diagram of "The" Black Strat, but performs
the exact same functions with the addition a few beneficial enhancements.
This is not the wiring diagram we provide with our "Black Strat® Parts Kits,
Assemblies
or Recessed Toggle Switch Brackets". They are more specific and true
to the original.
Based
on published information by Phil Taylor, David Gilmour's Black Strat® utilizes
a single .050 uF ceramic disc tone capacitor which works with both tone
potentiometers for neck and middle pickup tone control, it does not have the addition of the bridge tone control
modification and does not include a treble bypass circuit or utilize "no
load" tone potentiometers. These additional enhancements are what
I feel are beneficial and just make good sense.
IMPORTANT
NOTE:
If you are NOT using a Seymour Duncan pickup in the bridge position as
indicated above and using a Fender® pickup, then DO NOT
reverse wires on the bridge pickup connections, you would want to wire
your Fender® pickups all the same with the white wires connecting to the
5-way switch and black wires connecting to the ground.
IMPORTANT 2'ND NOTE: The above Important
Note does NOT apply to either of the two SSL-1C DG
pickups we offer, they are wound and polarized correctly
to match the two Fender Custom Shop pickups used in this
assembly.
|
|
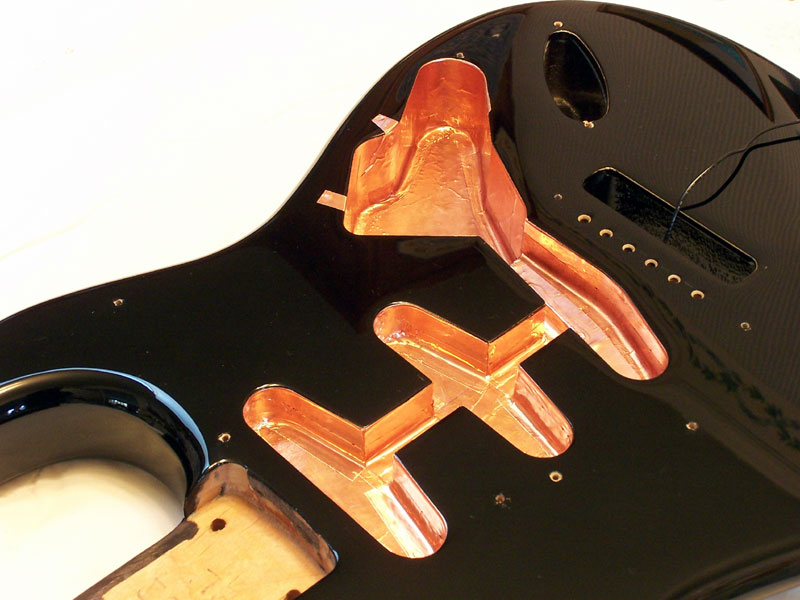
After
application of the adhesive copper foil shielding in the body cavities
to help reduce electrical interference. Notice the two small copper
tabs in the upper portion of the picture, these tabs protrude over to the
pickguard mounting holes and make contact with the shielding on the pickguard
and when screwed in place it makes contact with the body cavity shielding,
pickguard shielding and ground.
Notice
in the lower portion of the photograph just right of center and in-between
the neck and middle pickup routing cavities. This is the location
of one of the factory drilled standard '62 pickguard mounting screw holes.
The '62 body has this one differently located mounting hole on an 11 hole
pickguard, and since the pickguard manufacturer I selected did not offer a pickguard with '62 mounting
hole patterns I simply drilled the one hole in the body just to the right
of it required to attach the typical 11 hole pattern pickguard. This
new hole is just to the right and up a small amount as viewed in the above
photograph. The hole I drilled was a lot cleaner with smoother light
countersinking
than the factory drilled holes. It's as if Fender® doesn't quite care
as much for surface finish of these holes since they will be covered by
the pickguard. If you'll notice the 6 bridge mounting screw holes,
they have nice clean factory countersinking quite similar to the hole I drilled
which is necessary to have a good clean mating of the bridge plate with
the face of the body to allow for smooth bridge rocking or tremolo use.
|
|
A
few close-up photographs of the back side of each of the pickups.
Neck Pickup
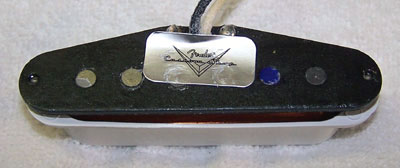
Fender® Custom Shop Fat '50s neck pickup. Notice the
blue dot on the one pole piece, second from the right,
this denotes this pickup as the neck pickup. Each
pickup in the Custom Shop Fat '50s set has different
characteristics and for them to be correctly identified
Fender® has color coded them. The bridge pickup has a
red dot and the middle pickup is simply silver with no
color coded pole piece but it is reverse wound for hum
cancelling in 5-way switching positions 2 and 4 and it
also has yellow and black leads indicating the reverse
winding.
|
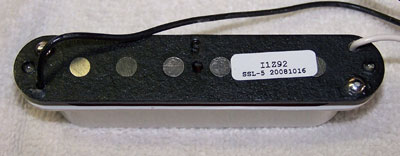
Middle Pickup
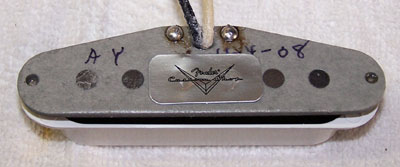 Fender® Custom Shop Custom '69 pickup (middle position). Initialed
and dated by long time pickup winder Abigail Ybarra of Fender.
|
|
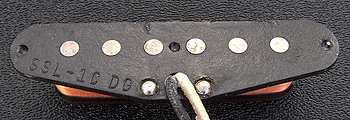
Bridge
Pickup
Seymour
Duncan SSL-5 Custom Staggered bridge pickup.
|
|
Something Special For
The Serious Gilmour Black Strat® Builder...
 Seymour Duncan's Custom "SSL-1C DG"
Pickup
- We have limited supply of this
unique and rare pickup that a lot of you serious Gilmour
Black Strat® builders have sought after. These are original,
authentic Seymour Duncan Custom Shop hand scatter-wound
pickups. These pickups are available
separately or
installed in our
Complete Black Strat® Pickguard
Assemblies. Seymour Duncan's Custom "SSL-1C DG"
Pickup
- We have limited supply of this
unique and rare pickup that a lot of you serious Gilmour
Black Strat® builders have sought after. These are original,
authentic Seymour Duncan Custom Shop hand scatter-wound
pickups. These pickups are available
separately or
installed in our
Complete Black Strat® Pickguard
Assemblies.
|
|
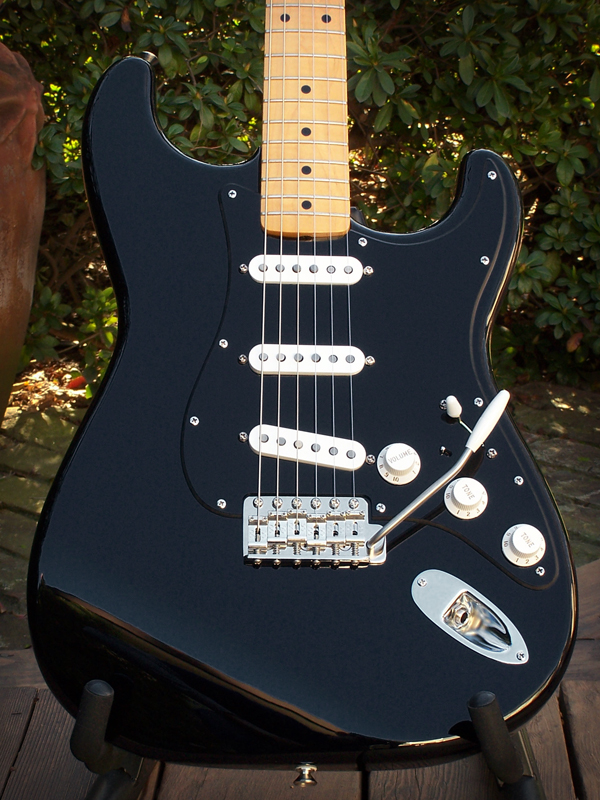
The completed Black Strat® body assembly. Ready to go, ready to rock!
|
|
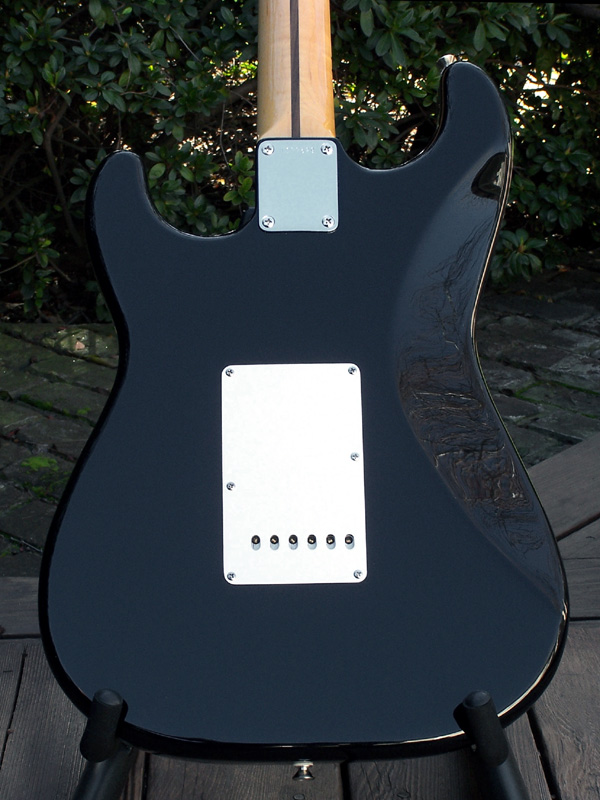
Back side of body showing
the 1 ply white vintage tremolo cavity cover.
|
|
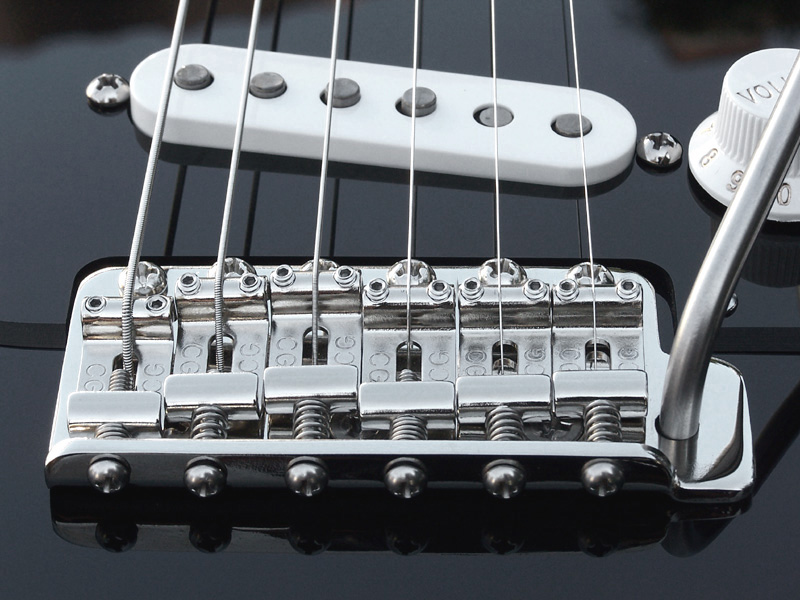
Close-up
detail of the Callaham Vintage S Model Bridge Assembly. I used to have the bridge mounted with the top plate flush with the body of the guitar
(see note below).
It was not set up or adjusted to be free floating. You could only loosen
the tension of the strings with tremolo use. It's a good idea to
apply some melted paraffin wax to the threads on the 6 bridge mounting
screws to help lubricate them during installation into the body.
I installed the two outer most bridge mounting screws first (without any
tremolo springs installed) and screwed them in just until the rear of the
bridge started to rise off the body a fraction of an inch and then backed
them off just enough so the bridge sat flush back on the body. This
ensures that the bridge will sit flush with the body without and pressure
downward on the front edge of the bridge with the two outer mounting screws.
I then installed the remaining 4 inner bridge mounting screws down to a
point of about 1/32 of an inch from the top plate for stability.
Once all 6 screws were in place I installed the tremolo arm and rocked
the bridge back and forth (without tremolo springs) to check for ease of
movement and for any binding of the mounting screws. It was nice
and smooth, no binding at all. You want your bridge to be free of
any binding or friction on the mounting screws to allow for smooth tremolo
use and tuning stability. The three tremolo springs were installed
and adjusted/tensioned to provide just enough back pressure on the bridge
to retain tuning stability and to keep the rear of the bridge flush with
the body, but when you use the tremolo arm it does not take much pressure
to lift the bridge. The tremolo springs are tight enough to not allow
any bridge lift during extreme string bends. There is that happy
medium of tremolo spring adjustment to allow easy tremolo use but still
stay stable in tuning. Of course all tremolo spring adjustments are
performed with the stings installed and tuned to playing pitch.
October 23, 2009:
I have since made an adjustment to the bridge on my
Black Strat® to have it set up as "Free Floating".
I feel that it is much smoother and are able to
achieve a more subtle tremolo effect. With it
mounted flush you are required to have some amount
of excess spring tension to retain the top plate of
the bridge flush with the body and the initial
amount of pressure required on the tremolo arm to
break the bridge free from sitting flush with the
body does not allow for smooth tremolo use.
With it free floating about 1/8" off the body you
then have the ability to increase tension on the
strings as well as loosen (raise or lower pitch).
For those of you purists (or
whatever they might consider themselves) who noticed and
made mention of the saddle height adjustment set screws
on the B and E string saddle being a bit long and
installed wrong.... No, they were not installed
incorrectly! This has been pointed out that those
set screws belong on the G and D saddles, but that's
just how they came from Callaham, and I really didn't
give them much thought or notice at the time of
installation, besides, they have since been replaced
with appropriate length set screws. I just don't
get why certain people just have to insist that one must
be ignorant or don't know what they're doing by having
such a small amount of extra height with a couple set
screws, and could cause such a fuss, I just don't get
it..... It's a non-issue. I guess it just comes
down to that no matter what you do, someone will go out
of their way to look for things to find fault with, and
will be most certain to point it out. I've heard
of this "constructive ctitisizm" thingy, but just being
an ass is a different story.
|
|
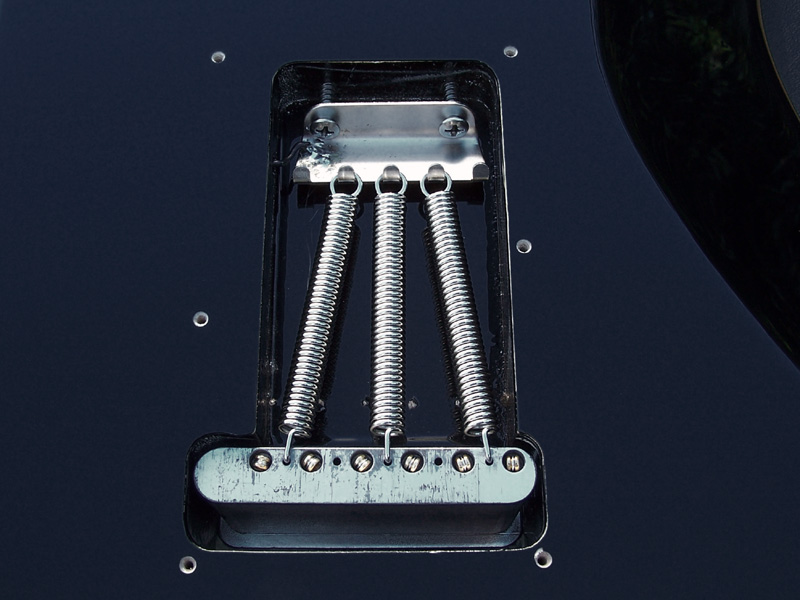
Tremolo
cavity, Callaham bridge block, tremolo spring claw and tremolo springs.
I prefer to have 3 springs installed, any more than that makes smooth tremolo
use more difficult. A grounding wire is soldered to the tremolo spring
claw and is inserted through the hole in tremolo cavity and passes through
to the electronics cavity on the front (top) side and is soldered to the
volume potentiometer case along with the other ground wires.
|
|
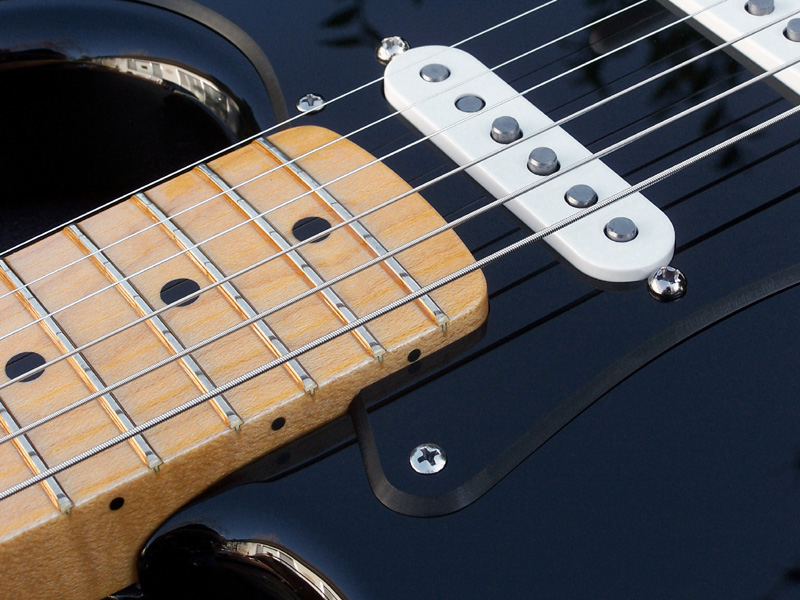
Heel of the 2008 '57 Re-issue
21 fret maple neck and the Fender® Custom Shop Fat '50 neck pickup.
|
|
Callaham
Vintage S Model Bridge with the Super Short 4-¼" tremolo arm.
Seymour Duncan SSL-5 bridge pickup and Fender® Custom Shop '69 middle pickup.
|
|

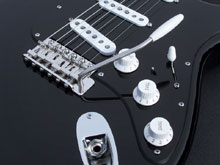
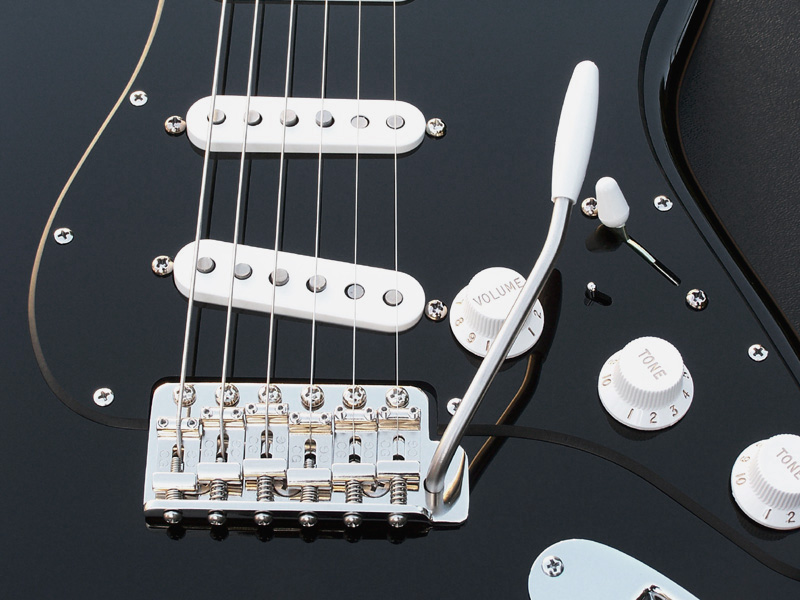
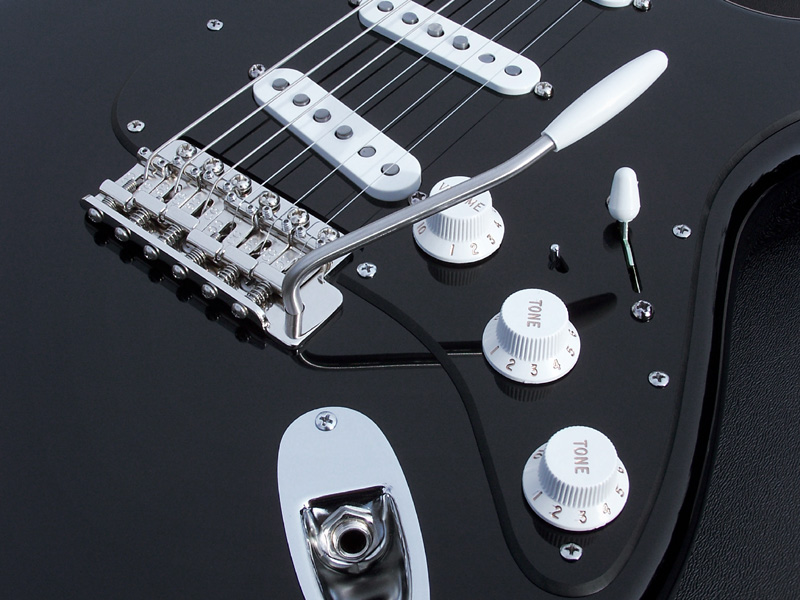
Close up detail of top side
of the body, controls, pickups and Callaham Vintage S Model Bridge Assembly
with the Super Short 4-¼" Tremolo Arm.
|
|
Another
close up detail photograph of the top side of the body from a different
angle.
|
|
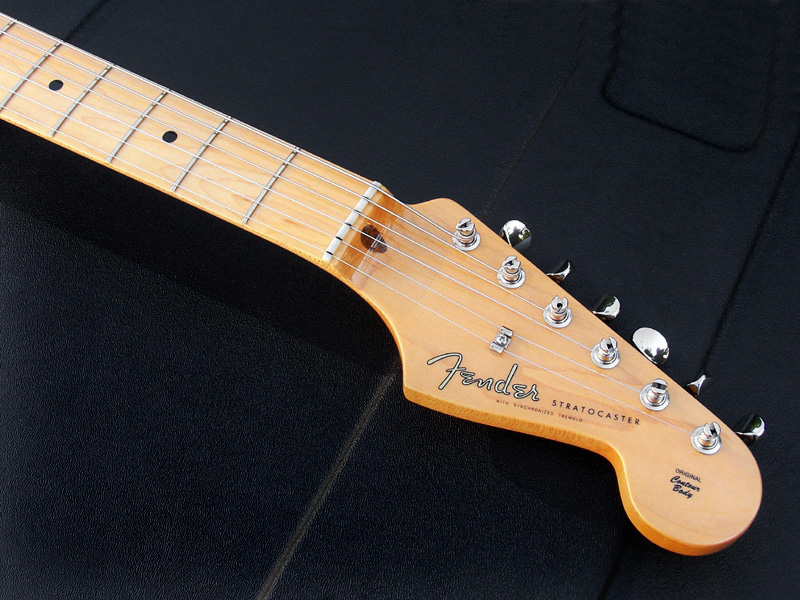
The 2008
'57 re-issue Fender® USA 7.25" radius 21 fret "V" shape maple neck.
Also showing the 1957 vintage re-issue Gotoh tuning
machines, Fender® spaghetti logo and the single string tree. Notice
the blackening in the string slots in the nut, this is the product called
"Slick Nutz" which is a liquefied graphite that assists in smooth string
movement during tremolo usage or string bends and helps the strings return
to correct pitch. Slick Nutz is applied as a thick liquid for ease
of application but soon after the moisture evaporates and the lubricating
graphite remains.
|
|

The 2008
'57 vintage re-issue Gotoh tuning machines from the rear of the head stock.
If building this project again or if I was to replace the tuning machines
I would go with the Kluson SD9105MN nickel tuning machines instead of the
Gotoh, I feel they are better tuners. I've got a set of them in stock,
I might change them out at some point down the road....
|
|

Close-up detail of the 2008
'57 re-issue Fender® USA 7.25" radius soft "V" shape maple neck at the 12'th
fret. It has a superb nitrocellulose lacquer finish throughout!
The USA '57 re-issue necks are very nice and don't compare to the newer
American Standard maple necks. The frets are vintage style so they
are smaller than the medium-jumbo frets you'll find on newer Strat's.
The '57 re-issue necks have 21 frets.
|
|
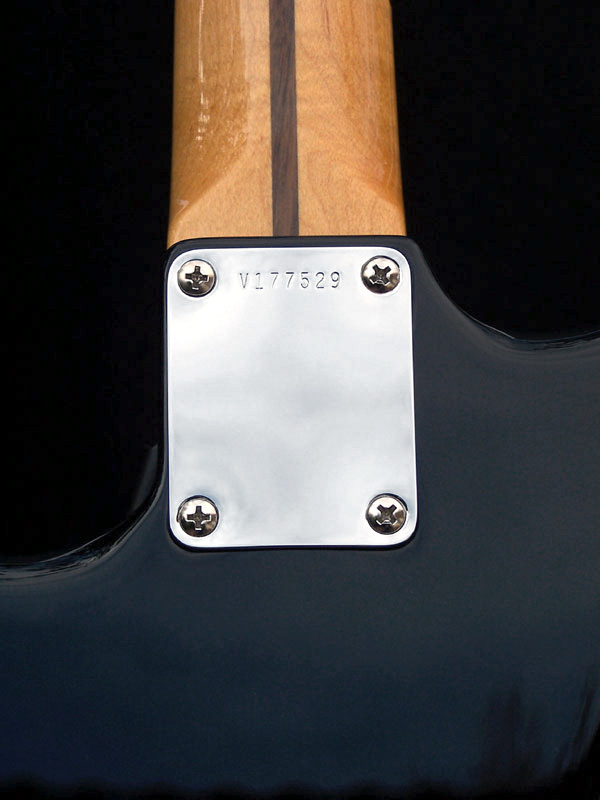
Fender® vintage serial numbered
neck plate. When installing the 4 neck joint screws it is wise to
apply melted paraffin wax to the threads to ease and lubricate installation.
Easy way to do this is to simply warm up the screws and touch them to the
block of wax. When the warm screw touches the wax it melts and adheres
to the screw threads. You don't need much, but it is better than
dry screws. You might notice this wax on factory installed screws
when you remove them, especially the larger ones.
|
|
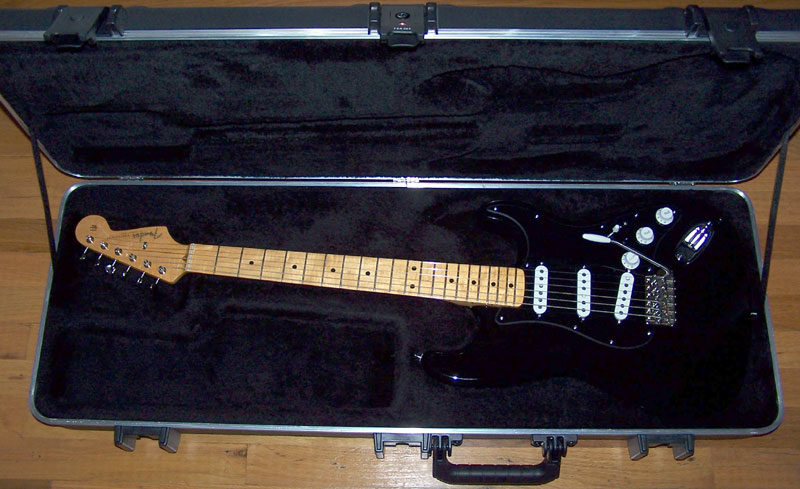
Nestled
in for a warm nights sleep in the Fender® SKB hard shell case.
|
|
Final
Notes Of The Black Strat® Build Project:
I designed
and constructed the small see-through (clear) routing jig to route the
small elongated hole for the recessed neck pickup toggle selector switch.
Sure, I could of simply drilled a large enough hole to allow for amount
of space needed to accommodate the range of throw this mini toggle switch
exhibits as it is recessed, but that would of put a 3/8" circular hole
which would of looked terrible with the recessed toggle protruding through,
you would be able to see directly into the pickguard and see the base of
the toggle switch and it's chrome locking nut and washer. I feel
that the 0.125" x 0.300" slot is much more desirable and visual appealing.
I also could of simply mounted the toggle switch as it was designed with
the small chrome washer and hex nut securing it on the top side of the pickguard
(panel mount style/method), but that would simply look bland and typical
and then the toggle lever would protrude approximately 1/2" to 3/4" above
the pickguard surface and could be easily switched unknowingly by a simple
bump of the knuckle. It may seem like a lot of work for such a small
feature, but I am a perfectionist (not always a good thing) and always
enjoy a challenge, and sometimes it's the small things that make the difference
between average and truly custom.
I also
designed and constructed the small stainless steel bracket that mounts
between the volume and neck tone control to secure the recessed mini toggle
switch.
After
initial construction of the guitar the following adjustments were performed:
- Each slot
of the nut was "cleaned-up" ever so gently with appropriate sized nut files
to allow for smooth, non-stick movement of the strings during tremolo action.
- Slick Nutz graphite was applied in each of the string slots of the nut
to provide nice smooth movement of strings through nut slots, Slick Nutz
graphite was also applied on the underside of the string tree to reduce
friction.
- Removed
the neck to make a truss rod adjustment for neck relief (twice).
- Adjust
each bridge saddle height for comfortable string height/action.
- Adjust
each bridge saddle for proper intonation.
- Adjust
each pickup height for balanced output.
- Adjust
tremolo spring tension to provide nice and smooth "free floating" tremolo action.
In Summary:
At the time of
this writing I've
custom built 8 completely unique Stratocaster's during the last 5 years
and I'd have to say that at this point this Black Strat® is the most satisfying with it's overall
sound quality, playability and visual appeal... This project
Strat® will remain as one of my favorites. It has a stark beauty all
it's own. Simply put, it is a dream to play, it sounds beautiful,
plays smooth and lends quite well to the creativity that comes from an
instrument that molds to you as one, and this is where musical creativity
can truly begin....
The
total cost of this Black Strat® is based entirely on already possessing the necessary tools for
assembly and setup, such as:
-
Dremel
hi-speed rotary tool.
-
Soldering
iron.
-
Solder.
-
22 Gauge Wire.
-
Wire cutters/strippers.
-
Assorted
sized Phillips and slotted screwdrivers (PH1 & PH2).
-
1/4" drive
socket set.
-
Hex wrenches.
-
Feeler
gauges.
-
6" stainless
steel rule graduated in 1/64" increments.
-
Capo.
-
Electronic
tuner.
-
Possibly
more that has escaped me for now....
If you
do not have any of these tools, parts or accessories already in your possession
your cost will be more. Price also depends on the source you acquire
your parts from and the quality level of the parts you choose for your
build project. One can always acquire lower quality or imported parts,
but remember, often you get what you pay for...
You
will also need a good working knowledge of the entire guitar setup and
assembly procedures, how to read a wiring diagram or schematic and how
to solder efficiently. You should also be proficient with using the
hi-speed rotary tool in order to accurately route the small elongated slot
in the pickguard for the mini toggle switch lever.
November 10, 2010:
In pondering whether or not to sell this guitar I came
to the realization that this single prototype Black
Strat® launched my business and one that is doing quite
well and growing nicely, and if I was to sell it, at
some point in time on down the road I'd probably be
kicking myself and wondering why the hell did I sell it,
it is the foundation of my business beginnings and
launched a desire to build the best Black Strat® replica
pickguard assembly you will find anywhere... So I
think I'll hang on to this guitar, it'll always bring
back memories of a time before OverDrive Custom Guitar
Works as well as a time that began it all...
April 7, 2011:
While reviewing this page this evening, specifically
looking at my wiring, I realize how much my wiring
skills have evolved and improved in the last 2-1/2 years
and when I look at the wiring of this particular project
I cringe at the thought of how ugly my wiring job was
back then. I guess after building hundreds of
these electronics assemblies you perfect your procedures
and methods and all by logic, you "should" get
better..... And I'm happy to say that I have....
Much better!
I will
continue to update this page as more detailed or subtle build information
comes to mind. The current revision date is found at the very top of this
page, if the date has changed since
the last time you visited then new information/revisions or updated photographs
have been added.
Do you have
a comment, question, suggestion or recommendation?
Please drop us a line, we'd love to hear from you.
|
